We all now have thousands of photos and videos digitally, with all mobile devices you have more restrictions on memory size than on a normal pc. So if you want to keep all of your photos on your mobile device or tablet you couldn’t just copy all of your photos across at full resolution as this would take too much space, so here are tips on resizing your photos so you can store more on your mobile devices.
My self over the past 10 years I have took in excess of 27,000 photos, now these have been taken with different cameras at different resolutions including 6mp, 8mp and 12mp. The storage size of these photos is just over 84gb of space. Now even as most tablets and phones have normally 32gb or 64gb of storage this is too much to have them on these devices, so for me as I have different devices with different screen resolutions, I have separate copies of the same photos in different resolutions just for a particular device. i.e my main tablet runs at a screen resolution of 1920×1200 pixels this is in 16:9 format, most digital cameras take in a 4:3 format, so for all my photos I have resized then down to 1600×1200 pixels so that it is the exact resolution for this screen.
So for me that 84gb re-sized down takes around 8gb in size, which means I can have all my photographs on my device all the time, and at this resolution is still perfect for sharing on the web.
Now this may sound hard and time consuming to resize all of your photos, but really it isn’t. With the aid of some software you could batch resize folders into a duplicate directory. There are a few on the market that can do this but I find a free program called “FOTOSIZER” does the job great, below are some tips on using this software though the same principles can be applied to other software. Visit HERE to goto the official website to download fotosizer
NOTE: My recommendation before resizing you photos is that you make a copy of the directory before resizing. The first reason for this is that it makes sure you don’t resize your originals and the other is you will have separate copies of your resized photos. For info on how to organise your files see my other article HERE.
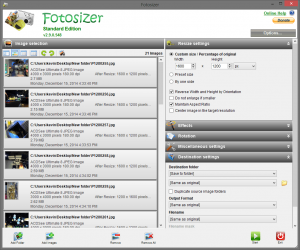
Once installed Fotosizer on your pc open the software, before opening your photos get the setting right first, on the left of fotosizer, under resize settings. The default type is percentage % so select px for pixel from the dropdown list, then set the width and height in pixels of the size you want to resize, ie for most mobile devices 1600×1200 will be sufficient. Also add tick to Reverse Width & Height by Orientation this will make sure the size is revered when in portrait or landscape.
To overwrite the files (this is why to create a copy) under destination folder drop down and select same as original and the same with filename. You can leave the rotation and misc setting alone at the moment as we are just concentration on resizing. Normally you should not need to change these options again, though on my pc I do have to select reverse by width & height every time. To import you photos you can either use the add folder button or drag and drop your directory directly into the fotosizer window.
Depending on the amount of images and there size and speed of your pc depends on the speed on conversion, on average should be no longer than a minute or two. Once done you can click on open destination folder to see your resized images. Then you can copy these resized images to your mobile devices and now they take up less room and then also you have the original full size images on your pc as a backup.
